Java路线
第一阶段入门进阶
- JAVA基本语法
- OO的编程思想
- 集合
- IO
- 异常
- 泛型
- 反射
- 多线程
- 函数式.
第二阶段Web基础和工具
- 前段基础三件套(html/css/js),
- jquery,ajax,jsp,cookie,session,
- http基础
- servlet基础,
- Git,SVN等代码管理工具
第三阶段企业级应用框架培训
- maven/gradle项目管理工具
- Spring全家桶:Spring/Spring MVC/ SpringBoot(比较先进的培训有SpringBoot,而SSH基本不用报)
- 关系型数据库 MySQL,jdbc,MyBatis,Hibernate.
- 非关系数据库 Redis缓存 (也是区别重点)
- 模板技术: thymeleaf,freemarker
第四阶段高级应用框架培训
- 搜索引擎 elastic search
- RPC框架/微服务框架: Dubbo,Spring Cloud(区别重点)
- 中间件技术 RabbitMQ,RocketMQ,ActiveMQ,Kafka等.
- 虚拟化技术:Docker容器,k8s容器编排技术等
第五阶段高级话题
- JVM优化和排错
- GC分析
- 数据库高级优化等话题
基本概念
Java语言的特点
- 面向对象
- 健壮性
- 跨平台性(JVM)
Java两种核心机制
- Java虚拟机(Java Virtual Machine)
可以理解为一个以字节码为机器指令的CPU,是解释型
- 垃圾回收机制(Garbage collection)
名词解释
JDK(J2SDK) & JRE
SDK(Software Development kit 软件开发包)
Java Runtime Environment (Java运行环境)
ps: 开发需要JDK,用户只需JRE。
- JDK = JRE + 开发工具集(例如Javac编译工具)
- JRE = JVM + Java SE标准类库
Java技术体系平台
Java SE(Java Standard Edition) 标准版
Java EE(Java Enterprise Edition)企业版
Java ME(Java Micro Edition)小型版
Java Card
IDE (Integrated Development Environment) 集成开发环境
基本语法
注释类型Comment
- 单行注释 //
- 多行注释 / /
- 文档注释 (Java特有)
1 | /** |
PS:文档注释的内容可以被javadoc所解析,生成一套以网页文件形式体现的该程序的说明文档。
2
>
Java API 文档
API (Application Programming Interface, 应用程序编程接口)
- 一个Java源文件只能有一个类声明public,该类名必须与文件名一致
- 程序入口是main()
- 输出语句:System.out.println() 输出数据再换行 / System.out.print()
- 编译会生成(多个)与源文件中类名相同的字节码文件。
关键字与保留字
Java保留字: goto 、const
标识符
各种变量、方法和类(凡是自己起名字的)
特点:字母,0-9,_ 或$组成,数字不开头
规范:(PS:Java 采用unicode字符集)
包名:多单词组成所有字母都小写:xxxyyyzz
类名、接口名:多单词所有单词首字母大写:XxxYyyZzz
变量名、方法名:第一个首字母小写其余首字母大写:xxxYyyZzz
常量名:所有字母大写,多单词下划线连接:XXX_YYY_ZZZ
变量
是程序中最基本的储存单元。包括变量类型、变量名和储存的值。先声明后使用
数据类型:
- 基本数据类型(primitive type)
- 整数类型(byte 1, short 2, int 4, long 8)
- 浮点类型(float 4数值范围大必须末尾加f, double 8双精度)
- 字符类型(char 2 ‘ ‘)
- 布尔型(boolean)
- 引用数据类型(reference type)
- 类(class)
- 接口(interface)
- 数组(string[])
基本数据类型转换(不包含boolean):
自动类型提升
byte、char、short互相 –> int –> long –> float –> double
强制类型转换
自动类型提升的逆运算,强制转换符()
1 | // 特殊情况1 |
引用数据类型string
string可以和8种基本数据类型进行运算,且只能进行连接运算: +
1 | //String str1 = 123;//false |
进制
- 二进制(binary):以0B或0b开头,原码 补码(反码+1) 反码(符号位不变)计算机底层都以补码存储数据
- 十进制(decimal)
- 八进制(octal):以数字0开头
- 十六进制(hex):以0x或0X开头
运算符
算术运算符
(%结果与被模数符号相同)(++不改变本身数据 类型)
赋值运算符
(+=不改变本身数据 类型,带隐形制性转换)
比较运算符
(ps: instanceof是否是string)
逻辑运算符
(逻辑 & | ! ^ 短路 && ||)
ps: & 与 && (| 与 ||类似)开发中推荐使用双
- 相同点:运算结果相同,当左边为true时都执行
- 不同点:当左边为false时,&继续执行&&短路不执行
位运算符
(<< (最高效2*8) >> (最高位0补0,1补1) >>>无符号右移(都用0补) & | ^(俩数交换) ~取反(补码各位取反))取决于数据类型
三元运算符
(? : )
ps:可以嵌套使用,凡是?:(运算效率高)都可以改写成if-else,反之不成立
[a:b] -> (int)(Math.random() * (b - a + 1) + a)
程序流程控制
基本流程结构:
- 顺序结构
- 分支结构
- if-else (万能)
- switch (执行效率更高,都可以转换成if-else,反之不成立)
- 循环结构
- while
- do-while
- for
- foreace
引用数据类型变量:数组
初始化
1
2
3
4
5
6
7
8
9
10
11
12
13
14
15// 静态初始化
int[] ids = new int[]{1,3,5,6};
int[] ids = {1,3,5,6}; //类型判断
int[][] ids1 = new int[][]{{3.4},{1,2,3},{5,6}};
// 动态初始化
int[] ids = new int[4];
int[] ods = new int[3][4];
String[][] arr = new String[1][2];
String[] arr[] = new String[1][2];
String[][] arr = new String[2][];
//错误String[][] arr = new String[][2];
// 数组一旦初始化完成,在内存中占有一连串地址,并且长度无法改变。PS:默认初始化值:整型为0,浮点型0.0,char为0或‘\u000’非这个‘0’,boolean型false,引用类型为null 非“null”,多维数组外层为地址值,内层地址未指定时为null。
获取数组的长度:length属性
1
System.out.println(name.length);
数组的遍历:for
1
2
3
4
5
6
7
8
9for (int i = 0; i < name.length; i++) {
System.out.println(name[i]);
}
for (int i = 0; i < arr.length; i++) {
for (int j = 0; j < arr[i].length; j++) {
System.out.println(arr[i][j]);
}
}内存结构解析
栈stack:局部变量
(基本数据类型的变量,一个对象的引用,函数调用的现场保留)
堆heap:new出来的结构:对象、数组(构造器创建的对象)
方法区:
常量池
静态域 (直接的100,“hello“,常量)
1
2
3
4String str = new String("hello");
//str -> 栈
//new出来的对象 -> 堆
//"hello"字面量 -> 静态区s数组中涉及的常见算法
1.数组元素的赋值(杨辉三角、回形数等)
2.求数值型数组中元素的最大值、最小值、平均数、总和等
3.数组的复制(需new)、反转、查找(线性查找、二分法查找(必须有序))
4.数组元素的排序算法(加粗手写,斜体原理)●选择排序:直接选择排序、堆排序
●交换排序:冒泡排序O(n^2)、快速排序O(nlog2n)
●插入排序:直接插入排序、折半插入排序、Shell排序(希尔)
●归并排序
●桶式排序
●基数排序Array工具类(操作数组的工具类Arrays.XXX)定义在java.util下
- boolean equals(int[] a, int[] b) 判断两个数组是否相等
- String toString(int[] a) 输出数组信息
- void fill(int[] a, int val) 将指定值填充到数组之中
- void sort(int[] a) 对数组进行排序
- int binarySearch(int[] a, int key) 对排序后的数组进行二分法检索特定的值(注意是排序后的)
数组中常见异常
角标越界异常:ArrayIndexOutOfBoundsExcetion
空指针异常:NullPointerException
*补充:eclipse快捷键
- 1.补全代码的声明:alt + /
- 2.快速修复: ctrl + 1
- 3.批量导包:ctrl + shift + o
- 4.使用单行注释:ctrl + /
- 5.使用多行注释: ctrl + shift + /
- 6.取消多行注释:ctrl + shift + \
- 7.复制指定行的代码:ctrl + alt + down 或 ctrl + alt + up
- 8.删除指定行的代码:ctrl + d
- 9.上下移动代码:alt + up 或 alt + down
- 10.切换到下一行代码空位:shift + enter
- 11.切换到上一行代码空位:ctrl + shift + enter
- 12.如何查看源码:ctrl + 选中指定的结构 或 ctrl + shift + t
- 13.退回到前一个编辑的页面:alt + left
- 14.进入到下一个编辑的页面(针对于上面那条来说的):alt + right
- 15.光标选中指定的类,查看继承树结构:ctrl + t
- 16.复制代码: ctrl + c
- 17.撤销: ctrl + z
- 18.反撤销: ctrl + y
- 19.剪切:ctrl + x
- 20.粘贴:ctrl + v
- 21.保存: ctrl + s
- 22.全选:ctrl + a
- 23.格式化代码: ctrl + shift + f
- 24.选中数行,整体往后移动:tab
- 25.选中数行,整体往前移动:shift + tab
- 26.在当前类中,显示类结构,并支持搜索指定的方法、属性等:ctrl + o
- 27.批量修改指定的变量名、方法名、类名等:alt + shift + r
- 28.选中的结构的大小写的切换:变成大写: ctrl + shift + x
- 29.选中的结构的大小写的切换:变成小写:ctrl + shift + y
- 30.调出生成 getter/setter/构造器等结构: alt + shift + s
- 31.显示当前选择资源(工程 or 文件)的属性:alt + enter
- 32.快速查找:参照选中的 Word 快速定位到下一个 :ctrl + k
- 33.关闭当前窗口:ctrl + w
- 34.关闭所有的窗口:ctrl + shift + w
- 35.查看指定的结构使用过的地方:ctrl + alt + g
- 36.查找与替换:ctrl + f
- 37.最大化当前的 View:ctrl + m
- 38.直接定位到当前行的首位:home
- 39.直接定位到当前行的末位:end
面向对象
Java类及类的成员:
- 属性、方法、构造器;代码块、内部类
类与对象
面向对象程序设计的重点是类的设计,设计类就是设计类的成员
类的成员
- 属性:Field = 域、字段 = 成员变量
- 行为:Method =(成员)方法 = 函数
类和对象的使用
创建类的对象 = 类的实例化 = 实例化类
调用对象的结构(属性、方法)
- 属性: object.field
- 方法: object.method()
对象的内存解析
堆(Heap)存放对象实例
栈(Stack)存储局部变量
方法区(Method Area)存储已被虚拟机加载的类信息、变量、静态变量、即时编译器编译后的代码等
理解万事万物皆对象
1 | 1. 在Java语言范畴中,我们将功能,结构等封装到类中,通过类的实例化,来调用具体的功能结构。 |
PS:引用类型的变量,只可能储存两类值,null 或 地址值(含变量的类型)
匿名对象的使用,只能调用一次
属性
属性(成员变量)VS 局部变量
相同点
定义变量格式相同,先声明后使用,且都有对应的作用域
不同点
声明的位置不同
属性:直接定义在类的{}中
局部变量:声明在方法内、方法形参、代码块内、构造器形参、构造器内部的变量
权限修饰符的不同
属性:可以在声明属性时,使用权限修饰符指明其权限
局部变量:不可以使用
默认初始化值的情况
属性:类的属性根据类型都有默认初始化值
局部变量:无初始化值
在内存中加载的位置
属性:堆空间(非static)
局部变量:栈空间
方法
方法重载(overload)
定义:在同一个类中允许存在一个以上的同名方法,只要他们的参数个数或者类型不同即可。(跟方法的权限修饰符、返回值类型、形参变量名、方法体都没有关系)
“两同一不同”:同一个类,同一个方法名。参数列表不同。
可变个数的形参
格式:数据类型 … 变量名, 必须申明在末尾,可传入参数个数为0个及以上
1 | public void show(String[] strs){} |
方法参数的值传递机制
变量赋值:
- 基本数据类型:赋值的是变量所保存的数据值
- 引用数据类型:赋值变量所保存数据的地址值
类的成员之三:构造器(构造方法constructor)
1 | Person p = new Person(); |
作用:创建对象;给对象进行初始化
格式:权限修饰符 + 类名(形参列表){}
ps:构造器可重载,且一旦显示定义了类的构造器之后,系统不再提供默认空参构造器。(必须自己加,一个类中至少有一个构造器)
类的成员之四:代码块(初始化块)
就是一对大括号,用来初始化类、对象,若有修饰,只能是static,
- 静态代码块
- 内部可以有输出语句,并随着类的加载而执行(不只是加载,最先甚至先于main方法),且只执行一次。
- 若多个静态代码块,按声明顺序依次执行,总优先于非静态代码块
- 静态代码块内只能静态的属性、方法,不能调用非静态的结构
- 作用:初始化类的信息(我一行写不下,应用场景如连接数据池)
非静态代码块
内部可以有输出语句,随着每次对象的创建而执行。
非静态代码块内既能静态的属性、方法,也能调用非静态的结构
调用顺序:
代码块的执行先于构造器,甚至先于main方法(由父及子,静态先行)
Root的静态初始化块
Mid的静态初始化块
Leaf的静态初始化块
Root的普通初始化块
Root的无参数的构造器
Mid的普通初始化块
Mid的无参数的构造器
Mid的带参数构造器,其参数值:“”
Leaf的普通初始化块
Leaf的构造器
属性赋值的相关问题:
可以对属性进行赋值的位置:
- 默认初始化
- 显式初始化
- 构造器中初始化
- 有对象后,通过“对象.属性”或“对象.方法”的方法进行赋值
- 在代码块中进行赋值
属性赋值的先后顺序:1 -> 2 / 5 (看谁后写)-> 3 -> 4
类的成员之五:内部类
类A声明在类B中,A为内部类
分类:成员内部类 (静态、非静态) VS 局部内部类(方法、代码块、构造器内)
成员内部类:
- 作为外部类的成员:调用外部类的结构、可以被static修饰、可以被四种权限修饰符修饰
- 作为一个类:内可以定义属性、方法、构造器等,可以被final修饰,可以被abstract修饰
- 相关使用细节:
1 | //如何实例化成员内部类的对象: |
局部内部类 的方法中,如果调用局部内部类所声明的方法中的局部变量, 要求此 局部变量 声明为 final 的(JDK8以后可以省略)
1 | //开发中局部内部类的使用: |
面向对象的三个特征
封装性、继承性、多态性、(抽象性)
封装与隐藏
体现:
- 将类的属性XXX私有化private,提供公有化public方法来获取getXXX和设置属性setXXX的值。
- 不对外暴露的私有的方法
- 单例模式(将构造器私有化)
- 如果不希望 类 在包外被使用可以设置成缺省
目标:高内聚,低耦合
PS:封装性的体现需要权限修饰符来体现。修饰 类 只能public与缺省
权限修饰符(从小到大)
| 修饰符 | 类内部 | 同一个包 | 不同包的子类 | 同一个工程 |
|---|---|---|---|---|
| private | √ | |||
| (缺省) | √ | √ | ||
| protect | √ | √ | √ | |
| public | √ | √ | √ | √ |
继承性inheritance
好处:
- 减少了代码的多余,提高代码的复用性
- 便于功能的扩展
- 为之后多态性的使用,提供了前提
格式:
1 | class A extends B{} |
- A:子类、派生类、subclass
- B:父类、超类、superclass
体现:一旦子类A继承父类B以后,子类A中就获取了父类B中声明的所有的属性和方法。(private的属性也继承到了,只是因为封装性的影响不能直接调用)
ps:Java只支持单继承和多继承,不允许多重继承,一个子类只能有一个父类。如果没有显式的声明一个类的父类的话,则此类继承于java.lang.Object类,所有Java类都直接或间接继承了java.lang.Object类。
方法的重写(override/overwrite)
定义:在子类中根据需要对父类中的方法进行改造。
应用:重写以后,当创建子类对象,调用同名方法时调用的是重写的方法。
规定:(建议:开发中直接从父类粘贴过来)
子类重写的方法名与形参列表与被重写一样
子类重写的方法的权限修饰符不小于父类被重写的方法的权限修饰符
ps:特殊情况,子类中不能重写父类中声明为private的方法。
返回类型:
- 父类被重写方法的返回类型为void,子类重写的方法只能返回void;
- 父类被重写方法的返回类型为基本类型,子类重写的方法只能返回相同的基本类型;
- 父类被重写方法的返回类型为A类型,子类重写的方法可以返回A类型或A的子类;
异常类型:子类重写的方法的异常类型不大于父类被重写的方法抛出的异常类型
特别注意:子类和父类的同名同参数的方法要么声明非static(考虑重写),要么都声明为static(不是重写,静态方法不能被覆盖)
区分重载和重写:
①二者的概念:
②重载和重写的具体规则
③重敢:不表现为多态性重写:表现为多态性
多态性polymorphism
定义:一个事物的多种形态
在Java中的体现:对象的多态性,父类的引用指向子类的对象
1 | Person p1 = new Man(); |
多态的使用:
在编译期,只能调用父类中声明的方法,在运行期,实际执行的是子类中的重写的方法。
虚拟方法调用(Virtual Method Invocation)
当调用子父类同名同参数的方法时,实际执行的是子类重写父类的方法
Java引用变量有两种类型:编译时类型 和 运行时类型。
调用方法时,编译看左边,执行看右边。–动态绑定
多态是运行时行为。重载是编译是就已经确定了,“早绑定”,”静态绑定”。
Bruce Eckel:”不要犯傻,如果它不是晚绑定,就不是多态。”
多态性的使用前提:
- 类的继承关系
- 方法的重写
ps: 对象的多态性,只适用于方法,不适用于属性(编译和运行都看左边) 1001 VS 1002
向下转型(使用强制类型转换符)
编译时只能调用父类声明的属性和方法,如何调用子类特有的属性和方法? 使用强制类型转换。
使用强制转换时,可能出现ClassCastException的异常。
使用instanceof进行检测:
1 | if(a instanceof A) { |
1.若子类重写了父类方法,就意味着子类里定义的方法彻底覆盖了父类里的同名方法,系统将不可能把父类里的方法转移到子类中。
2.对于实例变量,则不存在这样的现象,即使子类里定义了与父类完全相同的实例变量,这个实例变量依然不可能覆盖父类中定义的实例变量。
其他关键字:
this、super、static、final、abstract、interface、package、import与相关补充知识
this:
理解为 当前对象,通常可以省略。可以调用:属性(用以区分局部变量和属性)、方法和构造器。
调用本类中指定的构造器 this(形参列表) 减少代码重复,且必须放在构造器内第一行,最多只能声明一个来调用其他构造器。
ps: import static导入指定类或接口中的静态结构:属性、方法
super:
理解为 父类的,可以调用:属性、方法和构造器。
通常可以省略,当子类和父类中定义同名的属性时,需要显式的super
特殊情况, 当子类重写父类的方法时,需要调用父类中的方法时,需要显式的super
super调用父类构造器:在子类构造器中显式的“super(参数列表)”,且必须声明在子类构造器中的首行
在类的构造器中,针对“super(参数列表)”和“this(参数列表)”只能二选一,构造器中没有,默认super(空参)
在类的多个构造器中,至少有一个类的构造器使用了super(参数列表),调用父类的构造器。
虽然创建子类时调用了父类的构造器,只是创建了一个对象。
static:
某些特定的数据在内存中只有一份。eg:每个中国人都共享中国这个国籍。
修饰:属性、方法、代码块、内部类(注意构造器不行)
修饰属性:静态变量(类变量)
- 属性按是否有static修饰又分为:静态属性 VS 非静态属性(实例变量)
- 实例变量:当创建类的多个对象,每个对象都独立拥有一套类中的非静态属性,当修改某一个对象的静态属性时,不会导致其他对象中同样的属性值的修改。
- 静态属性:创建类的多个对象,每个对象都共享同一个静态属性。当修改某一个对象的静态属性时,会导致其他对象调用此静态变量时,属性值是修改的。
- PS:静态变量(类变量)随类的加载而加载,且早于对象的加载。因此可以通过”类.静态变量“进行调用。由于类只会加载一次 ,则静态变量在内存中也只会存在一份。
举例:System.out / Math.PI
修饰方法:静态方法
- 可以通过”类.静态方法“进行调用
- 静态方法只能调用静态的方法或属性,非静态则都可以。
- 在静态方法中,不能使用this,super关键字
static应用场景:
- 属性是可以被多个对象共享,不会随着对象的不同而改变
- 操作静态属性的方法,设置成static;工具类中的方法,习惯上声明为static
final:
可以修饰的结构:类、方法、变量
- 修饰类:此类不能被其他类继承。eg:String类、System类、StringBuffer类。
- 修饰方法:此方法不能被重写。eg:Object类中的getClass()。
- 修饰变量:此“变量”被称为一个常量。
- 修饰属性,之后(必须初始化)可以考虑的赋值位置有:显式初始化、代码块中初始化、构造器中初始化、不可以在方法中赋值(因为未调用)。
- 修饰局部变量:常量不可修改,尤其修饰形参时,表明此形参是常量,方法内不能重新赋值。
- static final 修饰属性:全局常量
abstract:抽象类与抽象方法
修饰的结构:类、方法
- 修饰类:抽象类,不可实例化,类中一定要构造器,便于子类实例化时调用(涉及:子类对象实例化的全过程)开发中,都会提供抽象类的子类。让子类对象实例化,完成相关的。
- 修饰方法:抽象方法只有方法的声明,没有方法体。包含抽象方法的类一定是一个抽象类,抽象类中可以没有抽象方法。若子类重写了父类的所有的抽象方法后,此子类方可实例化。若未重写,则该子类也是一个抽象类,需要abstract修饰。(子类必须重写后才可实例化)
- PS:abstract不可以用来修饰属性、构造器等。abstract不能修饰私有方法、静态方法、final的类与方法。
抽象类的匿名子类
1 | Worker worker = new Worker(); |
接口(interface)
与类并列的结构,一定程度解决类的单继承性的缺陷。本质是契约、规范、标准。(JDK7及以前)接口是一种特殊的抽象类,这种抽象类只包含常量和方法的定义。
继承是一个“是不是”的关系,而接口实现的是“能不能”的关系。(例如学生和运动员都能学习)
接口中的成员:
- JDK1.7及以前,只能定义全局变量和抽象方法(默认缺省也是)
- 全局变量:public static final的
- 抽象方法:public abstract的
- JDK8,除了定义以上之外,还可以定义静态static方法、默认default方法。
- JDK1.7及以前,只能定义全局变量和抽象方法(默认缺省也是)
接口中不能定义构造器!意味着接口不能实例化
Java开发中,接口通过让类去实现(implement)的方法来使用(面向接口编程),若实现类覆盖了接口的所有的抽象方法后,此实现类方可实例化。若未重写,则该实现类也是一个抽象类。
Java类可以实现多个接口(多实现),弥补类的单继承性的局限性。
1
2//先写extends再写implements
class AA extends BB implements CC,DD,EE接口与接口之间可以继承,而且可以多继承。
接口的具体使用,体现了多态性、
Java8中关于接口的改进
接口中定义的静态方法,只能通过接口来调用(像工具类)
通过实现类的对象,可以调用接口中的默认方法。
类优先原则:若子类(或实现类)继承的父类和实现的接口中声明了同名同参数的方法(属性bushi),那么子类在没有重写此方法的情况下,默认调用的是父类的同名同参数的方法。
接口冲突:若实现类实现了多个接口,而多个接口都定义了同名同参数的默认方法,在实现类没有重写的情况下,报错。因此实现类必须重写此方法。
如何在子类(实现类)的方法中调用父类、接口中被重写的(默认)方法:
1
2
3
4method();//调用自己重写的方法
super.method();//调用父类中声明的
Interface1.super.method();//调用接口中的默认方法
Interface1.method();//直接调用接口中的静态方法
接口的应用:
代理模式(Proxy)
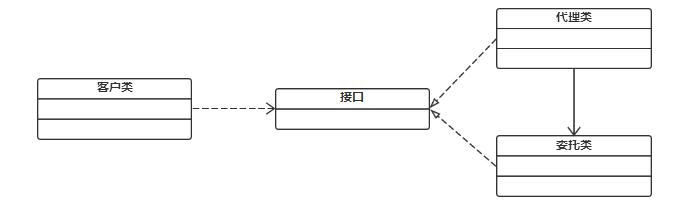
为其他对象提供一种代理以控制对这个对象的访问,另一个博文(中介,歌手经纪人)应用场景:
安全代理
远程代理
延迟加载
分类:
- 静态代理(静态定义代理类)
- 动态代理(动态生存代理类)
1 | //接口的应用:代理模式 举例 |
- 工厂模式 Factory
创建者和调用者分离。
补充
JavaBean
是一种Java语言写成的可重用组件,符合以下标准的Java类:
- 类是公共的
- 有一个无参的公共的构造器
- 有属性,且有对应的get、set方法
Debug调试
设置断点
| 操作 | 作用 |
|---|---|
| step into 跳入(f5) | 进入当前行所调用的方法中 |
| step over 跳过(f6) | 执行完当前行的语句,进入下一行 |
| step return 跳回(f7) | 执行完当前行所在的方法,进入下一行 |
| drop to frame | 回到当前行所在方法的第一行 |
| resume恢复 | 执行完当前行所在断点的所有代码,进入 下一个断点,如果没有就结束 |
| Terminate 终止 | 停止 JVM, 后面的程序不会再执行 |
JUnit单元测试方法
选中当前工程 - 右键选择:build path - add libraries - JUnit 4 - 下一步
创建Java类
(要求:①此类是public ②此类提供公共空参构造器)进行单元测试
在此类中声明单元测试方法
要求权限为 public,没有返回值 且 没有形参
PS:需要声明注释@Test,并导入包import org.junit.Test; 左键双击 单元测试方法名,右键:run as - JUnit Test
1
2
3
4
5
6
7
8
9import org.junit.Test;
public class JunitTest {
public void test1() {
}
}若执行结果无异常为绿色,异常为红。
Object类:
只定义了一个空参构造器
方法: clone() / getClass() / finalize() /hashCode() / wait() / notify() / notifyAll() / equals() / toString()
== VS equals()
== 是运算符,可以用于 基本数据 与 引用类型变量,前者比较保存的数据是否相同(不一定要类型相同,但必须一致,否则编译不通过),后者比较地址值是否相同,是否引用指向同一个对象
equals() 是一个方法,只能用于 引用数据类型变量 的比较,
*object类中定义的equals() 和 == 的作用是相同的*(未重写)。像String、Date、File、包装类等都重写了Object类中的equals()方法,重写以后比较的是两个对象的实体内容是否相同。若自己定义的类也要有这样的功能,比较对象的实体内容,应该重写equals()方法。(equals()建议反着写,比如:”反着来”.equals(str) ,这样可以避免str可能是空指针的情况!)1
2
3
4
5
6
7
8
9
10
11
12
13
14
15
16//重写的原则,比较两个对象的实体内容是否相同(举例:name和age)
public boolean equals(Object obj) {
if(this == obj) {
return true;
}
if(obj instanceof XXX) {
XXX xxx = (XXX)obj;
return this.age == xxx.age && this.name.equals(xxx.name);
} else {
return false;
}
}
//实际使用自动生成 和setter、getter一样
toString()方法
- 输出一个 引用变量 时,实际上输出的是对象的toString()
- 像String、Date、File、包装类等都重写了Object类中的toString()方法,返回“实体内容”信息
- 自定义类也可以重写该方法。
main()方法
- 作为程序的入口
- 也是一个普通的静态方法(只能调用静态属性方法,不然造类:通过实例化类对象调用普通属性与方法)
- 可以作为与控制台交互的方式(java xxxDemo “str”)因为有参数String[] args
包装类(Wrapper)的使用
针对八种基本数据类型定义相应的引用类型-包装类(封装类),具备类的特征,就可以调用类中的方法,实现真正的面向对象。
| 基本数据类型 | 包装类 |
| ———— | ————- |
| byte | Byte |
| short | Short |
| int | Integer |
| long | Long |
| float | Float |
| double | Double |
| boolean | Boolean |
| char | Character |Byte Short Integer Long Float Double 父类为Number
基本数据类型、包装类、String三者的相互转换
包装类 -> 基本数据类型:调用包装类的xxxValue()
基本数据类型 -> 包装类:调用包装类的构造器new()
基本数据类型、包装类 -> String类型:调用String重载的valueOf(Xxx xxx)
1
2
3
4
5int num1 = 10;
//方式一:连接运算
String str1 = num1 + "";
//方式二:调用String重载的valueOf(Xxx xxx)
String str2 = String.valueOf(num1);String类型 -> 基本数据类型、包装类:调用包装类的parseXxx()
1
2String str3 = "1234";
int num3 = Integer.parseInt(str3);
自动装箱与拆箱(JDK5.0以后)
1
2
3
4int num1 = 10;
Integer in1 = num1; //自动装箱
int num3 = in1;//自动拆箱
1 | // 关于包装类的比较迷惑的问题 |
设计模式
是在大量实践中总结和理论化后优选的代码结构、编程风格以及解决问题的思考方式。“套路”
单例(Singleton)设计模式
只能存在一个对象实例,好处减少了系统性能的开销(注意:学习时由static延申)
实现一:饿汉式 (线程安全)
私有化类的构造器
内部创建类的对象(private static)
提供公共的方法(public static),返回类的对象
1
2
3
4
5
6
7private Bank(){
}
private static Bank instance = new Bank();
public static Bank getInstance() {
return instance;
}
实现二:懒汉式 (延迟对象的创建)
私有化类的构造器
声明当前类对象(private static),没有初始化null
声明public、static的返回当前类对象的方法
1
2
3
4
5
6
7
8
9
10private Order(){
}
private static Order instance = null;
public static Order getInstance() {
if(instance == null) {
instance = new Order();
}
return instance;
}
饿汉式 VS 懒汉式
区别:懒汉式好处延迟对象的创建,饿汉式坏处,对象加载时间太长,但其是线程安全的
使用场景:
- 网站的计数器
- 应用程序的日志应用
- 数据库连接池
- 读取配置文件的类
- Application也是单例的典型应用
- Windows的Task Manager(任务管理器)
- Windows中的Recycle Bin(回收站)
模板方法设计模式(TemplateMethod)
抽象类体现的就是一种模板模式的设计,抽象类作为多个子类的通用模板,子类在抽象类的基础上进行拓展、改造,但子类总体上会保留抽象类的行为方式。
解决的问题:
- 当功能内部一部分实现是确定的,一部分实现是不确定的。这是可以把不确定部分暴露出来,让子类去实现。
- 在软件开发中实现一个算法时,整体步骤很确定、通用,这些步骤在父类中写好,但部分易变,可以将该部分抽象出来,供不同子类去实现。
MVC设计模式
模型层 model:主要处理数据
- 数据对象封装: model.bean/domain
- 数据库操作类: model.dao
- 数据库: model.db
视图层 view: 显示数据
- 相关工具类: view.utils
- 自定义view: view.ui
控制层 controller: 处理业务逻辑
- 应用界面相关: controller.activity
- 存放fragment: controller.fragment
- 显示列表的适配器: controller.adapter
- 服务相关的: controller.service
- 抽取的基类: controller.base
异常处理
概述与体系结构
开发过程中的 语法错误 和 逻辑错误 不是异常。
执行过程中出现的异常分为两类:
- Error:Java虚拟机无法解决的严重问题。eg:StackOverflowError 栈溢出 和 OutOfMemoryError 堆溢出。一般不编写针对性的代码进行处理。
- Exception:其他因编程错误或偶然的外在因素导致的一般性问题,可以使用针对性的代码进行处理。又分为编译时异常(受检checked异常) VS 运行时异常(非受检unchecked异常,RuntimeException)
异常处理机制
抓抛模型:
“抛”:程序在正常执行中,一旦出现异常就会在代码处生成一个对应异常类的对象,并抛出。之后的代码不再执行。
关于异常对象的产生:
系统自动生成的异常对象
手动的生成一个异常对象,并抛出(throw)
1
2throw new RuntimeException("nnn");
//自身并不输出nnn,被catch后.getMessage才有
‘’抓“:可以理解为异常的处理方式,如下两种方式:
① try-catch-finally
1 | try{ |
1 |
|
常用异常对象处理的方式:
①String getMessage()
②printStackTrace()
PS:
- catch中的异常类型 若无子类父类关系 ,无需考虑声明的先后顺序;若有,子类必须声明在父类的上面,否则报错(类似if和switch break)。
- 在try中声明的变量,在大括号外不能调用。try-catch-finally可以嵌套。
- finally是可选的,其中声明的是一定会执行的代码,即便catch中又出现了异常,try或catch中有return语句等情况。
- finally重要应用:像数据库连接、输入输出流、网络编程Socket等资源,JVM是不能自动的回收的,需要收到编写代码进行资源的释放,此时代码就需要编写在finally中。
体会:
- 使用try-catch-finally处理编译时异常,是使得程序在编译时不再报错,但在运行时仍可能报错。“延迟”到运行时
- 开发中,由于运行时异常比较常见,所以我们通常不针对运行时异常编写try-catch-finally,针对编译时异常,一定要考虑异常的处理。
② throws + 异常类型
(喊人通报,未解决)声明在方法的声明处,指明此方法执行时,可能回抛出的异常类型,一旦方法体执行时出现异常,仍会在异常处生成一个异常类的对象。此对象满足throws后的异常类型时,就会被抛出,之后的代码就不再执行。
如何选择
- 若父类中被重写的方法没有throws方式处理异常,则子类重写的方法也不能使用throws,意味着若子类重写的方法有异常必须使用try-catch-finally
- 执行的方法a中,先后调用了另外几个方法,这几个方法是递进关系执行的。建议这几个方法使用throws的方式处理(层层向上报),而执行的方法a可以考虑使用try-catch-finally
自定义异常类
继承现有的异常结构:RuntimeException、Exception
提供全局常量:serialVersionUID
提供重载的构造器
(记得要搭配throw手动抛出)
1 | public class MyException extends RuntimeException{ |
throw VS throws
- throw表示抛出一个异常类对象,生成异常对象的过程。声明在方法体内。
- throws属于异常处理的一种方式,声明在方法的声明处。
程序、进程、线程
基本概念
- 程序(program)是为完成特定任务、用某种语言编写的一组指令的集合。即指一段静态的代码,静态对象。
- 进程(process)是程序的一次执行过程,或是正在运行的一个程序。是一个动态的过程:有它自身的产生、存在和消亡的过程。——生命周期
PS:程序是静态的,进程是动态的
进程作为资源分配的单位,系统在运行时会为每个进程分配不同的内存区域。(方法区和堆) - 线程(thread),进程可进一步细化为线程,是一个程序内部的一条执行路径。
线程作为调度和执行的单位,每个线程拥有独立的运行栈和程序计数器(pc),线程切换的开销小。一个进程中的多个线程共享相同的内存单元/内存地址空间。它们从同一堆中分配对象,可以访问相同的变量和对象。这就使得线程间通信更简便、高效。但多个线程操作共享的系统资源可能就会带来安全的隐患。
何时需要多线程
- 程序需要同时执行两个或多个任务。
- 程序需要实现一些需要等待的任务时,如用户输入、文件读写操作、网络操作、搜索等。
- 需要一些后台运行的程序时。
多线程的创建
方法一:继承于Thread类
1 | /** |
创建Thread类的匿名子类的方法
1 | new Thread(){ |
Thread类中的常用方法:
1 | /** |
方法二:实现Runnable接口
- 创建一个实现了Runnable接口的类
- 实现类 去 实现Runnable中的抽象方法:run()
- 创建 实现类 的对象
- 将此对象作为参数传递到Thread类的构造器中,创建Thread类的对象
- 通过Thread类的对象调用start()
1 | /** |
两种创建方式的对比
开发中,优先选择实现Runnable接口的方式
原因:
- 实现的方式没有类的单继承的局限性
- 实现的方式更适合处理多个线程有共享数据的情况
联系:
1
public class Thread implements Runnable
相同点:都需要重写run(),将线程执行的逻辑声明在run()中
方法三:实现Callable接口
- 创建一个Callable的实现类
- 实现call方法,将线程需要执行的操作声明在call()中
- 创建callable实现类的对象
- 将此对象传递到FutureTask构造器中,创建FutureTask的对象
- 将FutureTask的对象作为参数传给Thread的构造器,创建Thread对象,并调用start()
- 获取Callable中call方法的返回值
使用Runnable VS Callable
如何理解与使用Runnable相比, Callable功能更强大些
- 相比run()方法,可以有返回值
- 方法可以抛出异常,被外面操作捕获,得到异常信息
- 支持泛型的返回值
需要借助FutureTask类,比如获取返回结果
Future接口
可以对具体Runnable、Callable任务的执行结果进行取消、查询是否完成、获取结果等。
- FutrueTask是Futrue接口的唯一的实现类
- FutureTask 同时实现了 Runnable, Future 接口。它既可以作为Runnable被线程执行,又可以作为Future得到Callable的返回值
1 | // 1. 创建一个Callable的实现类 |
方法四:使用线程池
背景: 经常创建和销毁、使用量特别大的资源,比如并发情况下的线程,对性能影响很大。
思路:提前 创建好多个线程,放入线程池中,使用时直接获取,使用完放回池中。可以避免频繁创建销毁、实现重复利用。类似生活中的公共交通工具。
步骤:
- 提供指定线程数量的线程池
- 执行指定的线程操作,需要提供实现Runnable、Callable接口实现类的对象
- 关闭连接池
好处:
- 提高响应速度(减少了创建新线程的时间)
- 降低资源消耗(重复利用线程池中线程,不需要每次都创建)
- 便于线程管理
- corePoolSize:核心池的大小
- maximumPoolSize:最大线程数
- keepAliveTime:线程没有任务时最多保持多长时间后会终止
1 | class NumberThread implements Runnable{ |
线程的生命周期

线程的同步
举例问题:卖票过程中,出现了重票、错票 –> 出现了线程的安全问题,通过同步机制来解决
方式一:同步代码块
1 | synchronized(同步监视器){ |
说明:操作共享数据的代码,及需要被同步的代码;共享数据,多个线程共同操作的变量;同步监视器,俗称:锁,任何一个类的对象都可以当锁,runnable实现类可以用this,或者用类(Xxxx.class)。(要求:多个线程必须要共同的一把锁)
补充:在实现Runnable接口创建多线程的方式中,我们可以考虑使用this充同步监视器;在继承Thread类创建多线程的方式中,慎用this充当同步监视器考虑使用当前类作为锁Xxxx.class
同步的优缺点:
- 好处:解决了线程的安全问题
- 局限性:操作同步代码时,只能有一个线程参加,其他线程等等待,效率较低。
方法二:同步方法
如操作共享数据的代码完整的声明在一个方法中。
总结:
- 同步方法仍然涉及到同步监视器,不需要显式的声明。
- 非静态的同步方法,同步监视器是:this;静态的同步方法,同步监视器是:当前类本身。
线程安全的饿汉式单例模式:
1 | class Bank{ |
线程的死锁问题
死锁的理解:
不同的线程分别占用对方需要的同步资源不放弃,都在等待对方放弃自己需要的同步资源,就形成了线程的死锁。
说明:
- 出现死锁后,不会出现异常、提示,只是所有的线程都处于阻塞状态,无法继续
- 使用同步的时候,要避免出现死锁。
方式三:lock锁 — JDK5.0新增
- 实例化ReentrantLock
- 调用lock
- 调用解锁方法:unlock
1 | class Window implements Runnable{ |
synchronized VS Lock 异同
- 相同:二者都可以解决线程安全问题
- 不同:synchronized机制在执行完相应的同步代码后,自动释放同步监视器;Lock需要手动的启动同步(Lock()),同时结束同步也需要手动的实现(unlock())
优先使用顺序:
Lock -> 同步代码块(已经进入了方法体,分配了相应资源) -> 同步方法(在方法体之外)
线程的通信
相关方法:
wait():一旦执行,当前线程就进入阻塞状态,并释放同步监视器
notify():唤醒被wait的一个线程,若有多个线程被wait,就唤醒优先级最高的
notifyAll():唤醒所有被wait的线程
说明:
- 此三个方法必须使用在同步代码块中
- 其调用者必须是 同步代码块中 的同步监视器,否则会出现IllegalMonitorStateException异常
- 都是定义在java.lang.Object类中
sleep() VS wait() 异同:
- 同:一旦执行,都可以是当前的线程进入阻塞状态
- 异:
- 方法声明的位置不同:Thread类中声明sleep,Object类中声明wait
- 调用的要求不同:sleep可以在任何场景下调用,wait必须使用在同步代码块中
- 是否释放同步监视器:若都使用在同步代码块或同步方法中,sleep不会释放锁,wait会释放锁
字符串相关的类
String
字符串是常量,用双引号引起来,他们的值在创建后就不能改变。
String对象的 字符串内容 是 存储在一个 字符数组final char[] value中。
特点
实现了 Serializable 接口,表示字符串支持序列化的;
实现了 Comparable 接口,表示String可以比较大小
String是一个final类,不可被继承,其代表不可变的字符序列。(不可变性)
体现:
- 当对字符串重新赋值时,需要重新指定内存区域赋值,不能使用原有的value进行赋值;
- 当对现有的字符串进行拼接时,也需要重新指定内存区域赋值,不能使用原有的value进行赋值;
- 当调用String的replace()修改字符串,也需要重新指定内存区域赋值。
1 | public final class String |
通过字面量的方式(区别于new方式)给一个字符串赋值,此时的 字符串值 声明在字符串常量池中,字符串常量池 不会重复储存相同的 字符串。
实例化的方式
- 通过字面量定义
- 通过new + 构造器
面试题:
1 | String s = new String("abc");//此方式创建对象,在内存中创建了几个对象? 俩:一个堆空间中new结构,另一个是char[]对应的常量池中的数据“abc” |
1 | public class StringTest { |
结论:
- 常量与常量的 拼接结果 在常量池。且常量池中 不会存在相同内容的常量。
- 只要拼接的其中有一个是变量,结果就在堆中(类似new)
- 如果拼接的结果 调用intern()方法,返回值就在常量池中
- final String(也在常量池中)和字面量连接,结果在常量池中
1 | public class StringTest { |
常用方法
- int length() :返回字符串的长度: return value.length
- char charAt(int index): : 返回某索引处的字符return value[index]
- boolean isEmpty() :判断是否是空字符串:return value.length == 0
- String toLowerCase() :使用默认语言环境,将 String 中的所有字符转换为小写
- String toUpperCase() :使用默认语言环境,将 String 中的所有字符转换为大写
- String trim(): :返回字符串的副本,忽略前导空白和尾部空白
- boolean equals(Object obj): :比较字符串的内容是否相同
- boolean equalsIgnoreCase(String anotherString) :与equals方法类似,忽略大小写
- String concat(String str) :将指定字符串连接到此字符串的结尾。 等价于用“+”
- int compareTo(String anotherString): :比较两个字符串的大小
- String substring(int beginIndex): :返回一个新的字符串,它是此字符串的从beginIndex开始截取到最后的一个子字符串。
- String substring(int beginIndex, int endIndex) : :返回一个新字符串,它是此字符串从beginIndex开始截取到endIndex(不包含)的一个子字符串。
- boolean contains(CharSequence s) :当且仅当此字符串包含指定的 char 值序列时,返回 true
- int indexOf(String str): :返回指定子字符串在此字符串中第一次出现处的索引
- int indexOf(String str, int fromIndex): :返回指定子字符串在此字符串中第一次出现处的索引,从指定的索引开始
- int lastIndexOf(String str): :返回指定子字符串在此字符串中最右边出现处的索引
- int lastIndexOf(String str, int fromIndex): :返回指定子字符串在此字符串中最后一次出现处的索引,从指定的索引开始反向搜索
注:indexOf和lastIndexOf方法如果未找到都是返回-1 - boolean endsWith(String suffix): :测试此字符串是否以指定的后缀结束
- boolean startsWith(String prefix): :测试此字符串是否以指定的前缀开始
- boolean startsWith(String prefix, int toffset): :测试此字符串从指定索引开始的子字符串是否以指定前缀开始
- 替换
- String replace(char oldChar, char newChar): :返回一个新的字符串,它是通过用 newChar 替换此字符串中出现的所有 oldChar 得到的。
- String replace(CharSequence target, CharSequence replacement): :使用指定的字面值替换序列替换此字符串所有匹配字面值目标序列的子字符串。
- String replaceAll(String regex, String replacement) : : 使 用 给 定 的replacement 替换此字符串所有匹配给定的正则表达式的子字符串。
- String replaceFirst(String regex, String replacement) : : 使 用 给 定 的replacement 替换此字符串匹配给定的正则表达式的第一个子字符串。
- 匹配
- boolean matches(String regex): :告知此字符串是否匹配给定的正则表达式。
- 切片
- String[] split(String regex): :根据给定正则表达式的匹配拆分此字符串。
- String[] split(String regex, int limit): :根据匹配给定的正则表达式来拆分此字符串,最多不超过limit个,如果超过了,剩下的全部都放到最后一个元素中。
类型转换
String 与 char[] 之间的转换:
String –> char[] 调用String的toCharArray()
1
char[] charArray = str1.toCharArray();
char[] –> String 调用String的构造器
1
String str2 = new String(arr);
String 与 byte[] 之间的转换:
String –> byte[] 调用String的getBytes()
1
byte[] bytes = str1.getBytes(); //使用默认的字符集进行编码
byte[] –> String 调用String的构造器
1
2String str2 = new String(bytes);//使用默认的字符集进行解码
//说明:解码时,要求解码使用的字符集必须和编码时使用的字符集一致,否则出现乱码
StringBuffer类
java.lang.StringBuffer代表 可变的字符序列,JDK1.0中声明,可以对字符串内容进行增删,此时不会产生新的对象。很多方法与String相同。作为参数传递时,方法内部可以改变值。
StringBuffer类不同于String,其对象必须使用构造器生成。有三个构造器:
- StringBuffer() :初始为 容量为16 的字符串缓冲区
- StringBuffer(int size) :构造 指定容量的字符串缓冲区
- StringBuffer(String str) :将内容初始化为指定字符串内容
StringBuffer 类的常用方法
- StringBuffer append(xxx):提供了很多的append()方法,用于进行字符串拼接(啥都变成字符串,例如“null”)
- StringBuffer delete(int start,int end):删除指定位置的内容
- StringBuffer replace(int start, int end, String str):把[start,end)位置替换为str
- StringBuffer insert(int offset, xxx):在指定位置插入xxx
StringBuffer reverse() :把当前字符序列逆转
public int indexOf(String str)
- public String substring(int start,int end)
- public int length()
- public char charAt(int n )
- public void setCharAt(int n ,char ch)
## StringBuilder类
StringBuilder和StringBuffer 非常类似,均代表可变的字符序列,而且提供相关功能的方法也一样
对比String 、StringBuffer 、StringBuilder
String(JDK1.0):不可变字符序列
StringBuffer(JDK1.0):可变字符序列、效率低、线程安全
StringBuilder(JDK 5.0):可变字符序列、效率高、线程不安全,底层都是使用char[] 存储
注意:作为参数传递的话,方法内部String不会改变其值,StringBuffer和StringBuilder会改变其值。
1 | String str = null; |
源码分析
1 | String str = new String();// char[] value = new char[0]; |
指导建议:
开发中使用,StringBuffer(int capacity) 或 StringBuilder(int capacity) 指定容量的
对比三者效率:
StringBuilder > StringBuffer > String
总结:
- 增:append(xxx)
- 删:delete(int start, int end)
- 改:setCharAt(int n, char ch) / replace(int start, int end, String str)
- 查:charAt(int n)
- 插:insert(int offset, xxx)
- 长度:length()
- *遍历:for() + charAt() / toString()
时间相关的类
JDk8之前的日期和时间的API
①. java.lang.System类
System.currentTimeMillis(): 返回当前时间与1970年1月1日0时0分0秒之间 以毫秒为单位的时间差,也称为时间戳
②. java.util.Date (java.sql.Date继承前者)
构造器:
- Date() 创建一个对应当前时间的Date对象
- //Date(int year, int month, int day) 创建一个对应时间的Date对象
- Date(long) 创建指定毫秒数的Date对象
方法:
- tiString() 显示当前年月日
- getTime() 获取当前Date对象对应的时间戳
java.sql.Date 对应着数据库中的日期类型的变量
将java.util.Date对象转换成java.sql.Date对象
1
java.sql.Date dateSql = new java.sql.Date(dateUtil.getTime());
1 | public class TimeTest { |
③. SimpleDateFormat类
java.text.SimpleDateFormat() 不与语言环境有关的方式来对Date类的格式化和解析的具体类
构造器:
- SimpleDateFormat() 默认的模式和语言环境创建对象
- SimpleDateFormat(String Pattern) 用参数pattern指定的格式创建一个对象。
该对象可以
- 格式化: 日期 -> 文本 String format(Date date)
- 解析:文本 -> 日期 Date parse(String source)
1 | public class DateTimeTesr { |
1 | public void test12() throws ParseException { |
④. Calendar类
是一个抽象基类,主要用于完成日期之间相互操作的功能。
1.实例化
方式一:创建其子类(GregorianCalendar)的对象
方式二:调用其静态方法getInstance()
2.常用方法
- get()
- set() 可变性
- add()
- getTime() 日历类 –> Date
- setTime() Date –> 日历类
注意:
- 获取月份时:一月是0 … 十二月是11
- 获取星期时:周日是1 … 周六是7
1 | /* |
JDK 8中新日期时间API
java.time
1 | /* |
Instant
瞬时
1 | /* |
java.time.format.DateTimeFormatter
1 | /* |
Java比较器
对象数组的排序问题,涉及对象之间的比较。Java对象正常情况下,只能进行比较: == 或 != ,不能使用 > 或 < 。Java实现对象排序的方式有两种:
自然排序:java.lang.Comparable
Comparable接口的使用举例 自然排序
像String、包装类等实现了Comparable接口,重写了compareTo(obj)方法,给出了比较两个大小的方式
像String、包装类等重写了compareTo()方法以后,进行了从小到大的排序
重写compareTo(obj)的规则:
如果当前对象this大于形参对象obj,则返回正整数;
如果当前对象this小于形参对象obj,则返回负整数;
如果当前对象this等于形参对象obj,则返回零。
对于自定义类,若需要排序,可让自定义类实现Comparable接口,重写compareTo(obj)方法,指明如何排序
1 |
|
定制排序:java.util.Comparator
背景:
当元素的类型没有实现Comparable接口 而又不方便修改代码;或者实现了Comparable接口的排序规则不适合当前的操作,那么可以考虑使用Comparator的对象来进行排序。
重写compare(Object o1, Object o2)方法,比较o1和o2的大小:
若方法返回正整数,表示o1大于o2;
返回0,表示相等;
返回负数,表示o1小于o2。
1 |
|
Comparable接口与Comparator的使用的对比:
前者一旦指定,保证Comparable接口实现类的对象在任何位置都可以比较大小;
后者属于临时性的比较。Arrays.sort(arr,new Comparator(){…..}
其他类
System类
System类代表系统,系统级的很多属性和控制方法都放置在该类的内部。该类位于java.lang包。
由于该类的构造器是private的,所以无法创建该类的对象,也就是无法实例化该类。其内部的成员变量和成员方法都是static的,所以也可以很方便的进行调用。
成员变量
System类内部包含 in、out和err 三个成员变量,分别代表 标准输入流(键盘输入),标准输出流(显示器)和 标准错误输出流(显示器)。成员方法
native long currentTimeMillis():
该方法的作用是返回当前的计算机时间,时间的表达格式为当前计算机时间和GMT时间(格林威治时间)1970年1月1号0时0分0秒所差的毫秒数。void exit(int status):
该方法的作用是退出程序。其中status的值为0代表正常退出,非零代表异常退出。 使用该方法可以在图形界面编程中实现程序的退出功能等。void gc():
该方法的作用是请求系统进行垃圾回收。至于系统是否立刻回收,则取决于系统中垃圾回收算法的实现以及系统执行时的情况。String getProperty(String key):
该方法的作用是获得系统中属性名为key的属性对应的值。系统中常见的属性名以及属性的作用如下表所示:| 属性名 | 属性说明 |
| ————- | ————————– |
| java. version | Java运行时环境版本 |
| java. home | java安装目录操作系统的名称 |
| os.version | 操作系统的版本 |
| user.nane | 用户的账户名称 |
| user.home | 用户的主目录 |
| user.dir | 用户的当前工作目录 |
1 |
|
Math类
java.lang.Math 提供了一系列静态方法用于 科学 计算。其 方法的参数和返回值类型一般为double 型。
- abs 绝对值
- acos,asin,atan,cos,sin,tan 三角函数
- sqrt 平方根
- pow(double a,doble b) a 的b 次幂
- log 自然对数
- exp e 为底指数
- max(double a,double b)
- min(double a,double b)
- random() 返回0.0 到1.0 的随机数
- long round(double a) double 型数据a 转换为long 型(四舍五入)
- toDegrees(double angrad) 弧度—> 角度
- toRadians(double angdeg) 角度—>弧度
BigInteger与BigDecimal
BigInteger类
java.math包的 BigInteger 可以表示不可变的任意精度的整数。提供所有 Java 的基本整数操作符的对应物,并提供 java.lang.Math 的所有相关方法。
另外,BigInteger 还提供以下运算:模算术、GCD 计算、质数测试、素数生成、位操作以及一些其他操作。
构造器
BigInteger(String val):根据字符串构建BigInteger对象常用 方法
public BigInteger abs():返回此 BigInteger 的绝对值的 BigInteger。
BigInteger add(BigInteger val) :返回其值为 (this + val) 的 BigInteger
BigInteger subtract(BigInteger val) :返回其值为 (this - val) 的 BigInteger
BigInteger multiply(BigInteger val) :返回其值为 (this * val) 的 BigInteger
BigInteger divide(BigInteger val) :返回其值为 (this / val) 的 BigInteger。整数相除只保留整数部分。
BigInteger remainder(BigInteger val) :返回其值为 (this % val) 的 BigInteger。
BigInteger[] divideAndRemainder(BigInteger val):返回包含 (this / val) 后跟(this % val) 的两个BigInteger 的数组。
BigInteger pow(int exponent) :返回其值为 (this exponent ) 的 BigInteger。
### BigDecimal类
一般的Float类和Double类可以用来做科学计算或工程计算,但在 商业计算中,到 要求数字精度比较高,故用到java.math.BigDecimal类 。
BigDecimal类支持不可变的、任意精度的有符号十进制定点数。
- 构造器
public BigDecimal(double val)
public BigDecimal(String val) - 常用方法
public BigDecimal add(BigDecimal augend)
public BigDecimal subtract(BigDecimal subtrahend)
public BigDecimal multiply(BigDecimal multiplicand)
public BigDecimal divide(BigDecimal divisor, int scale, int roundingMode)
1 | public void testBigInteger() { |
枚举类的使用
含义: 类的对象只有有限个,确定的。(当需要定义一组常量时,强烈建议使用枚举类。若枚举类只有一个对象,则可作为单例模式的实现方式。)
如何定义:
- 方式一:jdk5.0之前,自定义枚举类
- 方式二:jdk5.0时,可使用enum关键字定义枚举类
1 | public class enumTest { |
1 | public class enumTest1 { |
Enum类的主要方法
- values() 方法:返回枚举类型的对象数组。该方法可以很方便地遍历所有的枚举值。
- valueOf(String str):可以把一个字符串转为对应的枚举类对象。要求字符串必须是枚举类对象的“名字”。如不是,会有运行时异常:IllegalArgumentException。
- toString():返回当前枚举类对象常量的名称
1 | //values(): |
使用enum关键字定义的枚举类实现接口的情况
- 情况一:实现接口,在enum类中实现抽象方法;
- 情况二:让枚举类的对象分别实现接口中的抽象方法(每个都不一样)
1 | SPRING("春天", "春暖花开"){ |
注解(Annotation)的使用
框架 = 注解 + 反射 + 设计模式。
理解Annotation:
- jdk 5.0 新增的功能
- Annotation 其实就是代码里的 特殊标记, 这些标记可以在编译, 类加
载, 运行时被读取, 并执行相应的处理。通过使用Annotation, 程序员
可以在不改变原有逻辑的情况下, 在源文件中嵌入一些补充信息。 - 在JavaSE中,注解的使用目的比较简单,例如标记过时的功能,
忽略警告等。在JavaEE/Android中注解占据了更重要的角色,例如
用来配置应用程序的任何切面,代替JavaEE旧版中所遗留的繁冗
代码和XML配置等。
Annotation的使用示例
示例一:生成文档相关的注解
示例二: 在编译时进行格式检查(JDK 内置的三个基本注解)
- @Override: 限定重写父类方法, 该注解只能用于方法
- @Deprecated: 用于表示所修饰的元素(类, 方法等)已过时。通常是因为
所修饰的结构危险或存在更好的选择 - @SuppressWarnings: 抑制编译器警告
示例三: 跟踪 代码依赖性,实现替代配置文件功能
如何自定义注解
- 注解声明为:publi @interface XXX
- 内部定义成员,通常使用value表示
- 可以指定成员的默认值,使用default定义(String[] value default “hello”)
- 若自定义注解没有成员,表明是一个标识作用
PS:
- 若注解有成员,在使用注解时,需要指明成员的值
- 自定义注解必须配上注解的信息处理流程(使用反射)才有意义
- 自定义注解通常都会指明两个元注解:Retention、Target
jdk 提供的4种元注解
元注解:对现有的注解进行解释说明的 注解
- Retention:指定所修饰的 Annotation 的生命周期:SOURCE \ CLASS(默认行为)\ RUNTIME只有声明为RUNTIME生命周期的注解,才能通过反射获得
- Target:用于指定被修饰的 Annotation 能用于修饰那些程序元素
- Documented:表示所修饰的注解在被javadoc解析时,保留下来
- Inherited:被它修饰的 Annotation 将具有继承性
JDK8中 注解的新特性: 可重复注解 、 类型注解
可重复注解
① 在MyAnnotation 上声明@Repeatable,成员值为 MyAnnotation.class
② MyAnnotationd Taget 和 Reten等元注解与MyAnnotation相同。
类型注解
ELementType. TYPE PARAMETER 表示该注解能写在类型变量的声明语句中(如:泛型声明)
ELementType.TYPE_USE 表示该注解能写在使用类型的任何语句中
集合
概述
- 集合、数组都是对 多个数据 进行 存储操作 的结构,简称Java容器。
- 说明:此时的存储,主要指的是内存层面的存储,不涉及持久化的存储(.txt,.jpg,.avi,数据库中)
数组在存储多个数据方面的特点(缺点*):
- (*)一旦初始化后,长度就确定了
- 一旦定义好,元素的类型也确定了
- (*)提供的方法非常有限,对于添加、删除、插入数据等操作,非常不便,同时效率不高
- (*)获取数组中实际元素的个数的需求,没有现成的属性或方法可用
- (*)存储数据的特点:有序、可重复。对于无序、不可重复的需求,不能满足
Java集合 可以分为Collection 和 Map两种体系(接口)
- Collection接口:单列数据,定义了存取一些对象的方法的集合
- List:元素有序、可重复的集合,“动态数组”
- Set:元素无序、不可重复的集合,“数学上的集合”
- Map接口:双列数据,保存具有映射关系”key-value对”的集合,“数学上的函数映射”
集合框架
1 | |----Collection接口:单列集合,用来存储一个一个的对象 |
Collection常用方法(通用)
- add(Object e): 将元素e添加到集合coll中
- addAll(Collection coll1): 将coll1集合中的元素添加到当前的集合中
- size(): 获取添加的元素的个数
- clear(): 清空集合元素
- isEmpty(): 判断当前集合是否为空
1 |
|
- contains(Object obj): 判断当前集合中是否包含obj
PS:向Collection接口的实现类的对象中 添加数据obj时,要求obj所在类要重写equals()。不是判断地址,判断内容
1 |
|
- containsAll(Collection coll1): 判断形参coll1中的所有元素都存在于当前集合中。
1 | //2.containsAll(Collection coll1): 判断形参coll1中的所有元素都存在于当前集合中。 |
- remove(Object obj): 从当前集合中移除obj元素
1 |
|
- removeAll(Collection coll1): 差集,从当前集合中移除coll1中所有的元素
1 | //4.removeAll(Collection coll1): 差集,从当前集合中移除coll1中所有的元素 |
- retainAll(Collection coll1): 交集,获取当前集合和coll1集合的交集
1 |
|
- equals(Object obj)
1 | Collection coll1 = new ArrayList(); |
- hashCode(): 返回当前对象的哈希值
1 | Collection coll = new ArrayList(); |
集合 —> 数组:toArray()
/拓展:数组 —> 集合: 调用Arrays类的静态方法asList()
1 | Object[] arr = coll.toArray(); |
- iterator() 返回Iterator接口的实例,用于遍历集合元素,注意是一次性的
集合元素的遍历(迭代器接口Iterator)
- next() 判断是否还有下有一个元素
- hasNext() ①指针下移 ②将下移以后集合位置上的元素返回
1 |
|
- remove() 删除集合中某数据(调用前需要先next())
1 | while (iterator.hasNext()) { |
foreach 循环遍历集合
JDK5 新增了foreach 用于遍历数组和集合(内部任然调用迭代器)
- for(集合元素类型 局部变量:集合对象)
1 | for (Object obj : coll) { |
List接口
替代数组,元素有序,且可重复
具体实现类:ArrayList、LinkedList、Vector
三者异同:
同:三个类都实现了List接口,存储数据的特点相同,元素有序,且可重复
异:
ArrayList 作为List接口的主要实现类 ,线程不安全,效率高,底层用Object[]存储
LinkedList 底层用双向链表存储,对于频繁插入、删除操作,此类效率高
Vector 作为List的古老实现类,线程安全,效率低,底层用Object[]存储
Arraylist,的源码分析:JDK7情况下
ArrayList list= new ArrayList(/(底层创建了长度是10850bc数 HelementData List. add (123); //eLementData【0】= new Integer(123); List.0(1):/0果此次的添加导致底层 eLementDat数组容量不够,则扩容默认情况下,扩容为原来的容量的1.5倍,同时需要将原有数组中的数据复制到新的数组中结论:建议开发中使用带参的构造器:ArrayList List= new Arraylist( unt capacity)
JDK8中 ArrayList的变化:
ArrayList list= new ArrayList()/)底层0 bject】 elementdata初始化为},并没有创建List.0d(123);//第次调用d()时,底层才创建了长度10的数组,并将数据123添加到 elemen后续的添加和扩容操作与jR7无异
总结:JDK7中的 Arraylist的对象的创建类似于单例的汉式,而8中的ryst的对象的创建类似于单例的像汉式,延迟了数组的创建,节省内存
List中的常用方法
- void add (int index, Object ele):在 index位置插入eLle元素
- boolean addAll (int index, Collection eles):从 index位置开始特eles中的所有元素添加进来
- Object get ( int index):获取指定 index位置的元素
- int indexOf (Object obj):返园obj在集合中首次出现的位置
- int lastIndexOf (Object obj):返bj在当前集台中末次出现的位置
- Object remove ( int index):移除指定inex位置的元素,并返回此元素。(区别于Collection的,eg:List. remove(2); list.remove(new Integer (2);)
- Object set ( int index, Object ele):设置指定 index位置的元素为ele
- List subList ( int fromIndex, int toIndex):返从 fromIndex到 toIndex位置的子集合
总结:常用方法
- 增:add(Object obj)
- 删:remove(int index) / remove(object obj)
- 改: set(int index, Object ele)
- 查:get(int index)
- 插:add(int index, Object ele)
- 长度:size()
- 遍历:①Iterate送代器 ②增强for循环 ③普通的循环
Set接口
存储无序的、不可重复的数据 –> 数学中的“集合”
|—-HashSet、LinkedHashSet、TreeSet
- 无序性:不等于随机性,添加的位置不同
- 不可重复性:保证添加的元素按照equals()判断时,不能返回true
PS:Set接口中没有额外定义新的方法,使用的都是Collection中声明过的方法。
要求:
- 向Set中添加的数据,其所在类一定要重写hashCode() 和 equals()
- 重写的方法必须保持一致性,相同的对象必须具有相等的散列码。(技巧:对象中用作equals方法比较的Field,都应该用来计算hashCode值)
HashSet: 作为set接口的主要实现类;线程不安全的;可以存储null值
LinkedHashSet: 作为HashSet的子类,遍历内部数据时,可以按照添加的顺序遍历(原因:在添加数据的同时,每个数据还维护了俩应用,记录此数据前一个数据和后一个数据的地址)优点:对于频繁的遍历操作效率更高。
TreeSet: 可以按照添加对象的指定属性,进行排序
1 |
|
TreeSet:向其中添加数据,要求是相同的对象。比较是否添加的对象相同,此处不使用equals,可以分别实现Comparable和Comparator实现自然和定制排序。
- 自然排序使用的是compareTo返回0,必须重写compareTo
- 定制排序使用的是compare返回0,必须重写compare
1 |
|
Map接口
双列接口,用来存储一对(key-value)数据 –> y = f(x)
|—-HashMap :作为Map的主要实现类;线程不安全,效率高,能存储null 的key 和value,底层:数组+链表(JDK7)+红黑树(JDK8)
|—-LinkedHashMap :保证在遍历map元素时,可以按照添加的顺序实现遍历,对于频繁的遍历操作,此类执行效率高于HashMap
|—-TreeMap : 保证按照添加的 key-value对 进行排序,实现排序遍历,按照key自然排序或定制排序,底层使用红黑树。
|—-Hashtable : 作为古老的实现类,线程安全,效率低,不能存储null 的key 和value
|—-Properties : 常用来处理配置文件,key和value都是String类型、
Map结构的理解:
- Map中的 key:无序的、不可重复的,使用 Set 存储所有的key —–> key所在的类要重写equals和 hashCode
- Map中的 value:无序的、可重复的,使用 Collection存储所有的 value —–> value所在的类要重写equals
- 一个键值对:key- value构成了一个 Entry对象
- Map中的 entry:无序的、不可重复的,使用 Set 存所有entry
HashMap的底层实现原理
HashMap的底层实现原理?d7为例说明HashMap map new HashMap():
在实例化以后,底层创建了长度是16的一维数组 Entry【 table
..可能已经执行过多次put map. put(key1, vaLue1)
首先,调用key1所在类的 hashcode()计算key1哈希值,此哈希信经过某种算法计算以后,得到在 Entry数组中的存放位置。
如果此位置上的数据为空,此时的ey1- value1添加成功情况如果此位置上的数据不为空,(意味着此位置上存在一个或多个数据(以链表形式存在),比较key1和已经存在的一个或多个数据的哈希值:
如果Rey1的哈希值与已经存在的数据的哈希值都不相同,此的key1- value1添加成功。—)况2如果Rey1的哈希值和已经存在的某一个数据(Rey2-vaue2)的哈希值相同,继续比较:调用key1所在类的 equals(key2如果 equals()返aLse:此的key1-vae1添加成功。—情况3如果 equaLs()返回true:使用vLue1营换 value2补充:关于情况2和情况3:此的key1- value1和原来的数据以链表的方式存储
在不断的添加过程中,会涉及到扩容问题,默认的扩容方式:扩容为原来容量的2倍,并将原有的数据复制过来
jdk8相较于jdk7在底层实现方面的不同1. new Hash№p():底层没有创建一个长度为6的数组
2.j如k8底层的数组是:Mode【】,非 Entry【
3.营次调用put()方法的,底层创建长度为16的数组4.jk7底居结构只有:数组+链表。dR8中底居结构:数组+链表+红黑树当数组的某一个索引位置上的元素以链表形式存在的数据个数>8且当前数组的长度>64的此时此索引位置上的所有数据改为体用红黑树存储。
Map接口的常用方法
添加、删除、修改操作
Object put(Object key, Object value):将指定key-value添加到或修改)当前map对象中
void putALL(Map m):将m中的所有key-value对存放到当前map中
Object remove(Object key):移除指定key的key- value对,并返value
void clear():清空当前map中的所有数据
元素查询的操作:
Object get(Object key):获取指定key对应的value
boolean containsKey (Object key):是否包含指定的key
boolean containsValue(Object value):是否包含指定的value
int size():返回map中 key- value对的个数
boolean isEmpty():判断当前map是否为空
booLean equals(Object obj):判断当前map和参数对象obj是否相等
元视图操作的方法:
Set keySet():返回所有key构成的Set集合
Collection values():返园所有 value构成的 Collection集合
Set entrySet():返园所有key-value对构成的Set集台
1 |
|
总结:常用方法:
添加:put(Object key, Object value)
删除:remove(Object key)
修改:put(Object key, Object value)
查询:get(Object key)
长度:size()
遍历:keySet() / values() / entrySet()
向 TreeMap 中添加key- value,要求 key必须是由同一个类创建的对象,因为要按照key进行排序:自然排序、定制排序
1 | // Properties:常用来处理配置文件。key和value都是 String类型 |
Collections工具类
操作Set、List和Map等集合的工具类
● Collections中提供了一系列静态的方法对集合元素进行排序、查询和修改等操作,还提供了对集合对象设置不可变、对集合对象实现同步控制等方法。
●排序操作:(均为 static方法)
- reverse(List):反转List中元素的顺序
- shuffle(List):对List集合元素进行随机排
- sort(List):根据元素的自然顺序对指定List集合元素按升序排序
- sort(List, Comparator):根据指定的 Comparator产生的顺序对List集合元素进行排序
- swap(List,int,int):将指定List集合中的i 处元素和j 处元素进行交换
查找、替换
- Object max( Collection):根据元素的自然顺序,返回给定集合中的最大元素
- Object max( Collection, Comparator):根据 Comparator指定的顺序,返回给定集合中的最大元素
- Object min( Collection)
Object min(Collection, Comparator) - int frequency(collection, Object):返回指定集合中指定元素的出现次数
- void copy( List dest. List src):将src中的内容复制到dest中
- boolean replaceAll( List list, Object oldVal, Object newVal):使用新值替换List对象的所有旧值
1 |
|
Collections类中提供了多个synchronizedXxx()方法,该方法可使将指定集合包装成 线程同步 的集合,从而可以解决多线程并发访问集合时的线程安全。
泛型Generic
标签
概念
集合容器类在 设计阶段/声明阶段 不能确定这个容器到底实际存的是什么类型的对象,所以在JDK1.5之前只能把元素类型设计为 Object, JDK1.5之后使用泛型来解决。 因为这个时候除了元素的类型不确定,其他的部分是确定的,例如关于这个元素如何保存,如何管理等是确定的,因此此时把元素的类型设计成一个参数,这个类型参数叫做泛型。 Collection
所谓泛型,就是允许在定义类、接口时通过一个标识表示类中 某个属性的类型 或者是 某个方法的返回值及参数类型。这个类型参数将在使用时(例如,继承或实现这个接口,用这个类型声明变量、创建对象时)确定(即传入实际的类型参数,也称为类型实参)。
1 | //在集合中使用泛型之前的情况 |
1 | //在集合中使用泛型的情况:以 HashMap 为例 |
在集合中使用泛型总结
① 集合接口或集合类在jdk5.0时都修改为带泛型的结构。
② 在实例化 集合类 时,可以指明具体的泛型类型
③ 指明完以后,在集合类或接口中凡是定义类或接口时,内部结构(比如:方法、构造器、属性等)使用到类的泛型的位置,都指定为实例化的泛型类型。
比如:add(E e) —> 实例化以后:add(Integer e)
④ 注意点:泛型的类型必须是类,不能是基本数据类型。需要用到基本数据类型的位置,拿包装类替换
⑤ 如果实例化时,没有指明泛型的类型。默认类型为java.lang.Object类型。
自定义泛型结构
泛型类、泛型接口
1 | //子类在继承带泛型的父类时,指明了泛型类型。则实例化子类对象时,不再要指明泛型 |
PS:
泛型类可能有多个参数,此时应将多个参数一起放在尖括号内。
比如 <E1, E2, E3>
泛型类的 构造器 如下: public GenericClass(){}
而下面是错误的:public Generic Class(){} 实例化后,操作原来泛型位置的结构 必须与指定的泛型类型一致
泛型不同的引用不能相互赋值
尽管在编译时 ArrayList
和 ArrayList 是两种类型,但是,在运行时只有一个 ArrayList被加载到JVM中 泛型如果不指定,将被搽除,泛型对应的类型均按照Object处理,但不等价于Object。
经验:泛型要使用一路都用。要不用,一路都不要用。
如果泛型类是一个接口或抽象类,则不可创建泛型类的对象。
jdk1.7,泛型的简化操作:ArrayList
fist = new Array List<>();; 泛型的指定中不能使用基本数据类型,可以使用包装类替换。
在 类/接口 上声明的泛型,在本类或本接口中即代表某种类型,可以作为非静态属性的类型、非静态方法的参数类型、非静态方法的返回值类型。但在静态方法中不能使用类的泛型。
异常类不能是泛型的
不能使用new E。但是可以:E elements = (E) new Object()
参考:ArrayList 源码中声明:Object[] elementData,而非泛型参数类型数组。父类有泛型,子类可以选择保留泛型也可以选择指定泛型类型:
子类 不保留 父类的泛型:按需实现没有类型 擦除 具体类型
子类 保留 父类的泛型:泛型子类 全部保留 / 部分保留
结论:子类必须是“富二代”,子类除了指定或保留父类的泛型,还可以增加自己的泛型
泛型方法
在方法中出现了泛型的结构,泛型参数 与 类的泛型参数没有任何关系。
换句话说,泛型方法所属的类是不是泛型类都没有关系
泛型方法,可以声明为静态的。原因:泛型参数是在调用方法时确定的,并非在实例化类时确定。
1 | public static <E> List<E> copyFromArrayToList(E[] arr) { |
泛型在继承方面的体现
虽然类A是类B的父类,但是G 和 G 二者不具备子父类关系,二者是并列关系。
补充:类A是类B的父类,A
通配符: ?
类A是类B的父类,G 和G 是没有关系的,二者共同的父类是:G<?>
- 对于G<?> 就不能向其内部添加数据,除了添加null之外
- 允许读取数据,读取的数据类型为Object。
有限制条件的通配符
- ? extends A:
- ? super A:
1 | /*有限制条件的通配符的使用。 |
IO
File类
java.io.File类,文件和文件目录路径的抽象表示形式,与平台无关
- File类的一个对象,代表一个文件或一个文件目录(俗称:文件夹)
- File类声明在java.io包下
- File类中涉及到关于文件或文件目录的创建、删除、重命名、修改时间、文件大小等方法,
- 并未涉及到写入或读取文件内容的操作。如果需要读取或写入文件内容,必须使用IO流来完成。
- 后续File类的对象常会作为参数传递到流的构造器中,指明读取或写入的”终点”.
创建File类的实例
- File(String filePath)
- File(String parentPath,String childPath)
- File(File parentFile,String childPath)
PS:
- 相对路径:相较于某个路径下,指明的路径。
绝对路径:包含盘符在内的文件或文件目录的路径 - .路径分隔符
windows:\
unix:/
1 |
|
常用方法
- public String getAbsolutePath():获取绝对路径
- public String getPath() :获取路径
- public String getName() :获取名称
- public String getParent():获取上层文件目录路径。若无,返回null
- public long length() :获取文件长度(即:字节数)。不能获取目录的长度。
- public long lastModified() :获取最后一次的修改时间,毫秒值
如下的两个方法适用于文件目录:
- public String[] list() :获取指定目录下的所有文件或者文件目录的名称数组
- public File[] listFiles() :获取指定目录下的所有文件或者文件目录的File数组
1 |
|
- public boolean renameTo(File dest):把文件重命名为指定的文件路径
比如:file1.renameTo(file2)为例:要想保证返回true,需要file1在硬盘中是存在的,且file2不能在硬盘中存在。
1 |
|
- public boolean isDirectory():判断是否是文件目录
- public boolean isFile() :判断是否是文件
- public boolean exists() :判断是否存在
- public boolean canRead() :判断是否可读
- public boolean canWrite() :判断是否可写
- public boolean isHidden() :判断是否隐藏
1 |
|
创建
- public boolean createNewFile() :创建文件。若文件存在,则不创建,返回false
- public boolean mkdir() :创建文件目录。如果此文件目录存在,就不创建了。如果此文件目录的上层目录不存在,也不创建。
- public boolean mkdirs() :创建文件目录。如果此文件目录存在,就不创建了。如果上层文件目录不存在,一并创建
删除
- public boolean delete():删除文件或者文件夹
删除注意事项:**Java中的删除不走回收站**。
1 |
|
IO流
处理设备之间的数据传输,对于数据的输入输出操作以“流Stream”的方式进行。
流的分类
- 按操作数据单位不同分为:字节流(8bit),字符流(16bit)
- 按数据流的流向不同分为:输入流,输出流
- 按流的角色的不同分为:节点流,处理流
| 抽象基类 | 字节流 | 字符流 |
|---|---|---|
| 输入流 | InputStream | Reader |
| 输出流 | OutputStream | Writer |
PS:
- Java的O流共涉及40多个类,实际上非常规则,都是从如上4个抽象基类派生的
- 由这四个类派生出来的子类名称都是以其父类名作为子类名后缀
流的体系结构
| 抽象基类 | 节点流(或文件流) | 缓冲流(处理流的一种) |
|---|---|---|
| InputStream | FileInputStream (read(byte[] buffer)) | BufferedInputStream (read(byte[] buffer)) |
| OutputStream | FileOutputStream (write(byte[] buffer,0,len) | BufferedOutputStream (write(byte[] buffer,0,len) / flush() |
| Reader | FileReader (read(char[] cbuf)) | BufferedReader (read(char[] cbuf) / readLine()) |
| Writer | FileWriter (write(char[] cbuf,0,len) | BufferedWriter (write(char[] cbuf,0,len) / flush() |
节点流
字符流
1.read() 从内存中写出数据到硬盘的文件里。
- File类的实例化
- FileReader流的实例化
- 读入的操作
- 资源的关闭
说明点:
- read()的理解:返回读入的一个字符。如果达到文件末尾,返回-1
- 异常的处理:为了保证流资源一定可以执行关闭操作。需要使用try-catch-finally处理
- 读入的文件一定要存在,否则就会报FileNotFoundException。
1 |
|
//对read()操作升级:使用read的重载方法
1 |
|
2.write() 从内存中写出数据到硬盘的文件里。
说明:
- 输出操作,对应的File可以不存在的。并不会报异常
- File对应的硬盘中的文件如果不存在,在输出的过程中,会自动创建此文件。
File对应的硬盘中的文件如果存在:如果流使用的构造器是:**FileWriter(file,false)** / **FileWriter(file)**:**对原有文件的覆盖** 如果流使用的构造器是:**FileWriter(file,true)**:**不会对原有文件覆盖,而是在原有文件基础上追加内容**
1 |
|
1 |
|
字节流
结论:
- 对于文本文件(.txt,.java,.c,.cpp),使用字符流处理
- 对于非文本文件(.jpg,.mp3,.mp4,.avi,.doc,.ppt,…),使用字节流处理
1 | //使用字节流FileInputStream处理文本文件,可能出现乱码。 |
实现对图片的复制操作
1 |
|
缓冲流
处理流,就是“套接”在已有的流的基础上。处理流之一:缓冲流
- BufferedInputStream
- BufferedOutputStream
- BufferedReader
- BufferedWriter
作用:提高流的读取、写入的速度(内部提供了一个缓冲区)
实现非文本文件的复制
1 |
|
实现文本文件的复制
1 |
|
实现文件复制的方法
1 | public void copyFileWithBuffered(String srcPath,String destPath){ |
转换流
处理流之二:转换流
转换流:属于字符流
InputStreamReader:将一个字节的输入流转换为字符的输入流
OutputStreamWriter:将一个字符的输出流转换为字节的输出流
作用:提供字节流与字符流之间的转换
解码:字节、字节数组 —>字符数组、字符串
编码:字符数组、字符串 —> 字节、字节数组
字符集
ASCII:美国标准信息交换码。
用一个字节的7位可以表示。
ISO8859-1:拉丁码表。欧洲码表
用一个字节的8位表示。
GB2312:中国的中文编码表。最多两个字节编码所有字符
GBK:中国的中文编码表升级,融合了更多的中文文字符号。最多两个字节编码
Unicode:国际标准码,融合了目前人类使用的所有字符。为每个字符分配唯一的字符码。所有的文字都用两个字节来表示。
UTF-8:变长的编码方式,可用1-4个字节来表示一个字符。
1 | /* |
其他流
- 标准的输入、输出流
- 打印流
- 数据流
标准的输入、输出流
- System.in:标准的输入流,默认从键盘输入
- System.out:标准的输出流,默认从控制台输出
System类的 setIn(InputStream is) / setOut(PrintStream ps) 方式重新指定输入和输出的流。
练习:
从键盘输入字符串,要求将读取到的整行字符串转成大写输出。然后继续进行输入操作,
直至当输入“e”或者“exit”时,退出程序。
方法一:使用Scanner实现,调用next()返回一个字符串
方法二:使用System.in实现。System.in ---> 转换流 ---> BufferedReader的readLine()
1 | public static void main(String[] args) { |
打印流
PrintStream 和 PrintWriter
实现将基本数据类型的 数据格式 转化 为字符串输出,提供了一系列重载的print() 和 println()
练习:
1 |
|
数据流
DataInputStream 和 DataOutputStream
作用:用于读取或写出基本数据类型的变量或字符串
练习:将内存中的字符串、基本数据类型的变量写出到文件中。
注意:处理异常的话,仍然应该使用try-catch-finally.
1 |
|
将文件中存储的基本数据类型变量和字符串读取到内存中,保存在变量中。
注意点:读取不同类型的数据的顺序要与当初写入文件时,保存的数据的顺序一致!
1 |
|
对象流
ObjectInputStream 和 ObjectOutputStream
作用:用于存储和读取基本数据类型数据或对象的处理流。它的强大之处就是可以把Java中的对象写入到数据源中,也能把对象从数据源中还原回来。
要想一个java对象是可序列化的,需要满足相应的要求。见Person.java
1
2
3
4
5
6
7
8
9
10
11/**
* Person需要满足如下的要求,方可序列化
* 1.需要实现接口:Serializable
* 2.当前类提供一个全局常量:serialVersionUID
* 3.除了当前Person类需要实现Serializable接口之外,还必须保证其内部所有属性也必须是可序列化的。(默认情况下,基本数据类型可序列化)
*
* 补充:ObjectOutputStream和ObjectInputStream不能序列化static和transient修饰的成员变量
*/
public class Person implements Serializable{
public static final long serialVersionUID = 475463534532L;
...序列化机制:
对象序列化机制允许把内存中的Java对象 转换成 平台无关的 二进制流,从而允许把这种 二进制流 持久地保存在磁盘上,或通过网络将这种二进制流传输到另一个网络节点。
当其它程序获取了这种二进制流,就可以恢复成原来的Java对象。
1 | /* |
随机存取文件流
RandomAccessFile
- 直接继承于java.lang.Object类,实现了DataInput 和 DataOutput接口
- 既可以作为一个输入流,又可以作为一个输出流
- 作为输出流时,写出到的文件如果不存在,则在执行过程中自动创建。
- 如果写出到的文件存在,则会对原有文件内容进行覆盖。(默认情况下,从头覆盖,不是覆盖文件)
- 可以通过相关的操作,实现RandomAccessFile “插入”数据的效果
1 |
|
使用RandomAccessFile实现数据的插入效果
1 |
|
网络编程
概述
网络编程中有两个主要的问题:
- 如何准确地定位网络上一台或多台主机;定位主机上的特定的应用
- 找到主机后如何可靠高效地进行数据传输
网络编程中的两个要素:
- 对应问题一:IP和端口号
- 对应问题二:提供网络通信协议:TCP/IP参考模型(应用层、传输层、网络层、物理+数据链路层)
通信要素一:
IP和端口号
- IP:唯一的标识 Internet 上的计算机(通信实体)
- 在Java中使用InetAddress类代表IP
- IP分类:IPv4 和 IPv6 ; 万维网 和 局域网
- 域名: www.baidu.com www.mi.com www.sina.com www.jd.com
- 本地回路地址:127.0.0.1 对应着:localhost
- 如何实例化InetAddress:两个方法:getByName(String host) 、 getLocalHost()
- 两个常用方法:getHostName() / getHostAddress()
- 端口号:正在计算机上运行的进程。
- 要求:不同的进程有不同的端口号
- 范围:被规定为一个 16 位的整数 0~65535。
- 端口号与IP地址的组合得出一个网络套接字:Socket
1 | public static void main(String[] args) { |
实现TCP的网络编程
- 例题3:从客户端发送文件给服务端,服务端保存到本地。并返回“发送成功”给客户端。
- 并关闭相应的连接。
1 |
|
UDPd协议的网络编程
1 | //发送端 |
URL网络编程
URL:统一资源定位符,对应着互联网的某一资源地址
格式:
http://localhost:8080/examples/beauty.jpg?username=Tom
协议 主机名 端口号 资源地址 参数列表
1 | public static void main(String[] args) { |
1 | public static void main(String[] args) { |
*idea快捷键:
- 重构一切:Ctrl+Shift+Alt+T
- 智能补全:Ctrl+Shift+Space
- 选你所想:Ctrl+W
- 自我修复:Alt+Enter
- 自动完成:Ctrl+Shift+Enter
- 可以新建类、方法等任何东西、get/set、toString方法: alt+insert
- 自动new完整对象: Ctrl+Alt+V,可以引入变量
- 自动选中模块代码:Ctrl+W
- 移动到前/后方法:Alt+Forward/Backward
- 删除行:Ctrl+Y、复制:Ctrl+D
- 切换vim模式:Ctrl+;
- 高亮错误或警告快速定位:F2或shift+F2
- 打开类或资源:Ctrl+N/Ctrl+Shift+N
- 弹出框中搜索任何东西,包括类、资源、配置项、方法:Shift+Shift
- 查看当前类的所有方法:Ctrl+F12
- 找到类或方法使用的地方:,Alt+F7
- 格式化import列表:Ctrl+Alt+O,格式化代码:Ctrl+Alt+L
- 查看项目结构选中类:Alt+1,查看搜索窗口:Alt+3,查看运行调试Alt+4/5
- 打开最近打开或编辑过的文件列表:Ctrl+E
- 运行程序:Alt+Shift+F10,启动调试:Shift+F9,停止:Ctrl+F2。
- 调试:F7/F8/F9分别对应Step into,Step over,Continue
- 上/下移一行:Alt+Shift+Up/Down
反射
概述
反射的特征:动态性
疑问1:通过直接new的方式或反射的方式都可以调用公共的结构,开发中到底用那个?
建议:直接new的方式。
什么时候会使用:反射的方式。
疑问2:反射机制与面向对象中的封装性是不是矛盾的?如何看待两个技术?
不矛盾。
java.lang.Class类的理解
- 类的加载过程:
程序经过javac.exe命令以后,会生成一个或多个字节码文件(.class结尾)。 接着我们使用java.exe命令对某个字节码文件进行解释运行。相当于将某个字节码文件 加载到内存中。此过程就称为类的加载。加载到内存中的类,我们就称为运行时类,此 运行时类,就作为Class的一个实例。 - 换句话说,Class的实例就对应着一个运行时类。
- 加载到内存中的运行时类,会缓存一定的时间。在此时间之内,我们可以通过不同的方式来获取此运行时类。
获取Class的实例的方式
- 调用运行时类的属性:.class
- 通过运行时类的对象,调用getClass()
- 调用Class的静态方法:forName(String classPath)
- 使用类的加载器:ClassLoader (了解)
1 | //(前三种方式需要掌握) |
Class实例可以是哪些结构的说明:
1 | //万事万物皆对象?对象.xxx,File,URL,反射,前端、数据库操作 |
了解类的加载器
1 |
|
使用 ClassLoader加载配置文件
1 | //Properties:用来读取配置文件。 |
通过反射
创建运行时类的对象
- newInstance(): 调用此方法,创建对应的运行时类的对象。内部调用了运行时类的空参的构造器。
要想此方法正常的创建运行时类的对象,要求:- 运行时类必须提供空参的构造器
- 空参的构造器的访问权限得够。通常,设置为public。
在javabean中要求提供一个public的空参构造器。原因:
1.便于通过反射,创建运行时类的对象
2.便于子类继承此运行时类时,默认调用super()时,保证父类有此构造器
1 |
|
体会反射的动态性
1 |
|
获取运行时类的完整结构
属性结构
- getFields(): 获取当前运行时类及其父类中声明为public访问权限的属性
- getDeclaredFields(): 获取当前运行时类中声明的所有属性。(不包含父类中声明的属性)
1 |
|
权限修饰符 数据类型 变量名
1 |
|
方法结构
- getMethods(): 获取当前运行时类及其所有父类中声明为public权限的方法
- getDeclaredMethods(): 获取当前运行时类中声明的所有方法。(不包含父类中声明的方法)
1 |
|
权限修饰符 返回值类型 方法名(参数类型1 形参名1,…) throws XxxException{}
1 |
|
构造器结构
- getConstructors(): 获取当前运行时类中声明为public的构造器
- getDeclaredConstructors(): 获取当前运行时类中声明的所有的构造器
1 |
|
其他结构
获取运行时类的父类
1 |
|
获取运行时类的带泛型的父类
1 |
|
获取运行时类的带泛型的父类的泛型
1 |
|
获取运行时类实现的接口
1 |
|
获取运行时类所在的包
1 |
|
获取运行时类声明的注解
1 |
|
调用运行时类的指定结构
属性、方法、构造器
1 | // 不需要掌握 |
操作指定的属性
1 | /* |
指定的方法
1 | /* |
指定的构造器
1 | /* |
应用:动态代理
静态代理举例
特点:代理类和被代理类在编译期间,就确定下来了。
1 | interface ClothFactory{ |
动态代理的举例
要想实现动态代理,需要解决的问题?
问题一:如何根据加载到内存中的被代理类,动态的创建一个代理类及其对象。
问题二:当通过代理类的对象调用方法a时,如何动态的去调用被代理类中的同名方法a。
1 | interface Human{ |
新特性
Java8其他新特性
Lambda表达式
1 | /** |
函数式 Functional接囗
1 | /** |
方法引用与构造器引用
1 | /** |
1 | /** |
强大的 Stream API
1 | /** |
1 | /** |
1 | /** |
Optional类
1 | /** |